Saturday, December 31, 2011

Happy New Year!

Today was pretty mellow - slept late. went grocery shopping, had pizza for dinner with mom.  Glad I didn't have a party because while we may have had a brown Christmas here in MN, we're having a white New Year:
 

That's out my bedroom window right now, I literally just took the pic to include with this post =)
 
If your interested in my resolutions, I'll be talking about those on my other blog later, but one I will share with you guys is to be more organized overall.  This is the disaster area that is my desktop right now:
 
 
Tea mug, marbling test papers & test polishes, NOTD polishes I haven't posted yet, cuticle oil - just to name a small portion of the clutter.  So I'm going to do some cleaning, and some posting, and drink some wine & go to bed =)  I may squeeze changing my nails in there too but it remains to be seen LOL
 
If you're in for the night, have a cozy evening - if you're out you won't be reading this until later I suppose but I hope you have a safe & happy time =)
 
Thanks for reading.
 
~Colette

Wednesday, December 28, 2011

Pre-Christmas Haul

I have my Christmas Eve Haul still to post too (which includes my Finger Paints Special Effects!).  But I got some good stuff in this haul too:


Ulta Salon Formula:


Taupe on a Rope, Into Astrono-Me?, Smoke Screen, Envy, Chocolate Kiss.

Orly:


China Glaze:


Revlon:


Mistletoe, Smoldering, Catty, Naughty, Dreamer.

Sally Hansen Diamond Strength:


3k or More, Glass Slipper (which you can see on my mom's nails over Big Smoke HERE).

And of course, finally:


Essie Shine of the Times.  Never expected to find it at Walgreens LOL.

Thanks for reading.

~Colette

Guest NOTD: Butter London Big Smoke + Sally Hansen Glass Slipper

Mom had been wanting to wear Butter London Big Smoke for quite a while, and when I picked up Sally Hansen Glass Slipper she decided to pair them together.  Here's a "before" shot of BS on its own:


And with the bling amped up with GS added on top:


This ended up being her Christmas manicure =)

Thanks for reading.

~Colette


Sunday, December 25, 2011

Merry Christmas!

Off shortly to spend the day with family, I hope you all have a wonderful holiday as well =)
 
My new goal is to be caught up with all my NOTDs by New Years. I am off on Monday so hopefully that will help me meet that goal LOL.  Until then, if you want to catch up with a few of my Christmas looks that haven't made it onto the blog yet, or from past years, check out some vids from my Christmas Nail Art playlist:
 
 
Thanks for reading =)
 
~Colette

Friday, December 23, 2011

Cooking With Colette ~ Fruit Tart

I've decided to push my comfort zone a bit & do a few cooking tutorials - my fruit tart was a no-brainer to put on my to-bake list & I just happened to be making one about the time I made the decision.  Took me 2 months to edit LOL but here it is:


If you'd like to make it yourself, here is the original recipe with some notes on how I do it at the end - I've posted it on the blog before, & may eventually upload it to GoogleDocs also, so I can have recipes there all in one place, but I don't know when I'll get around to that: 
 
Fruit Tart
 
Cooking Time:  about 30 minutes
Preparation Time:  about 45 minutes
 
Ingredients for Shortbread Crust:
  • 1/2 cup (1 stick) unsalted butter, softened
  • 1/3 cup granulated sugar
  • 1/4 teaspoon vanilla
  • 1 cup all-purpose flour
 
Ingredients for Cream Cheese Filling:
  • 8 ounces cream cheese, softened
  • 1/2 cup granulated sugar
  • 1 large egg
  • 1/2 teaspoon vanilla
 
Ingredients for Fruit Topping:
  • About 3 cups fresh fruit, such as berries, peaches or plums, sliced small if large
  • Apricot preserves or apple jelly (optional)
  • Freshly squeeze lemon juice (optional)
 
Directions for Shortbread Crust:
 
Heat oven on Convection Bake mode to 325 degrees F. Use an electric mixer to cream butter and sugar until fluffy. Mix in vanilla. Add flour and mix until a dough forms. Pat dough into a flat disc and press it evenly into a 9-inch tart pan with a removable bottom.
 
Bake until lightly browned, about 15 minutes. Set aside to cool. (Crust can be made up to two days ahead. Wrap tightly in foil when cool and refrigerate.)
 
Directions for Cream Cheese Filling:
 
Use an electric mixer to beat cream cheese and sugar together. Add egg and vanilla; then beat until fluffy. Pour filling into baked crust. Bake at 325 until just set, about 20 minutes.
 
Directions for Assembling Fruit:

Cool tart for a few minutes. Arrange fruit in a decorative pattern on top of torte, anchoring each piece by pressing it slightly into the soft cheese filling.
 
If using apricot preserves, heat them slightly in a small saucepan. Strain and discard the pieces. Place strained preserves or apply jelly in saucepan along with a squeeze of lemon. Bring to a boil over moderately high heat. Brush glaze over fruit. Chill tart until cream cheese filling is firm, about 3 hours.
 
So, that's the official version - now on to a few notes of how I do it =)
 
The first note I have is that we don't have a Convection Bake mode on our oven. So for the crust, I usually set the regular oven between 325-350, and check the crust at around 20 minutes. It should be just turning golden around the edges when you take it out. Same temp goes for the filling, and I'd suggest checking it at about 25 minutes. Give it a little wiggle to see if the middle is set or still jiggly.
 
For the pan that you use, if you have a tart pan with high sides, you're probably OK using that. I usually use a spring-form pan that's probably intended for cheesecake or something. It does have a removable bottom, but the sides are tall enough to keep the fruit from falling off if you pile it high & then need to transport the dessert. I also line the pan with a layer of parchment paper, so that the crust doesn't stick to the bottom.
 
As far as mixing the ingredients, you're fine with either a spoon or electric mixer.  I've used both. As long as you've softened the butter & cream cheese, it's not that hard to do with like a wooden spoon or whatever utensil you'd like to use.
 
I cut up my fruit while the filling is cooking. I really don't know if I use the full 3 cups recommended, but this all comes down to personal taste. Whatever's in season & whatever fruit you like, it will be delicious on top of this.
 
The apricot preserves or apple jelly really are totally optional. It will give the tart a glossy look, but it's an extra step that really doesn't add anything so feel free to skip it. If you do chose to do it - DO NOT microwave the preserves or jelly. Made that mistake one time & it just was not pretty, it totally caramelized & hardened into this thick dark sludge. Not cute.
 
When you're ready to serve, go around the outside of the pan with a knife, just to help release the crust & filling from the edge. Release the spring-form & lift out the bottom. With the parchment, it's also pretty easy to slide the whole tart off of the bottom of the pan as well, which makes it a little easier to cut (the one I have has a lip around the edge) - the crust is almost like a cookie-texture, so you need to make sure you cut all the way through.
 
& that's that!  I hope you guys enjoyed =)

Thanks for reading.

~Colette

Thursday, December 22, 2011

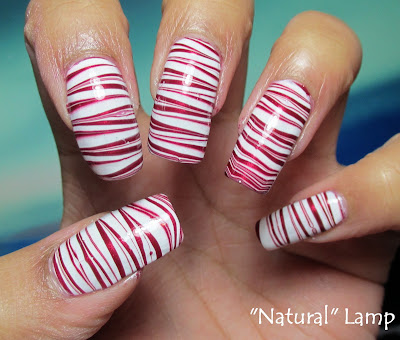
NOTD: Candy Cane Water Marble + Tutorial

Finally!  I made it to my holiday nails before Christmas Day =)  Due to being so pleased with this one that I wore it a whole week, I am very close to being caught up for the first time since October LOL.
 
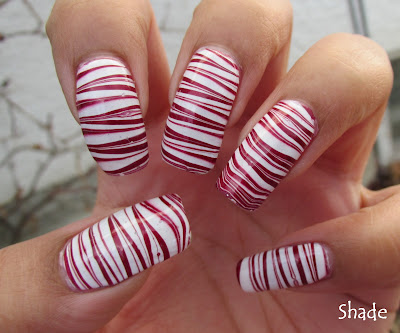
For my base color I used 2 coats of Ulta Professional Angel Baby, marbling done with AB & Ulta Salon Ruby Slipper:
 

The hard part for this, is keeping the stripes the same size throughout.  I managed to keep them pretty even per hand, but my hands next to each other you can see the difference.  I actually had one that came out thickly striped & looked really good, but I took it off & changed it to match with the thinner stripes.  Here are my favorite nails:
 
 
And here is the tutorial:
 
 
Another couple of Christmas tutorials coming, and going to try & get my first cooking tutorial up in the morning before work so stay tuned =)  Thanks for reading.
 
~Colette

Wednesday, December 21, 2011

NOTD: Ulta Into Astrono-Me?

This was my base color in the Konad FAQ I posted a couple of days ago - a really really subtle color in the bottle, on the nail it's so deep & gorgeous.  Ulta Into Astrono-Me?:
 

Almost caught up (again) =)  & almost to some Christmas nails!  Thanks for reading.

~Colette

Guest NOTD: China Glaze Some Like it Haute

Mom was pretty blinged up!  She knew I had several similar colors to this, and after comparing them she picked China Glaze Some Like it Haute:
 

I may turn her into a glitter addict yet =)  Thanks for reading.
 
~Colette

Tuesday, December 20, 2011

NOTD: OPI Ali's Big Break

This came out more ... hmmm, I don't know what to say other than more tomatoey on my nail than it looked in the bottle.  A little weird, it made me like it less.  I prefer a red with a blue undertone I guess.  But I don't dislike it either, it is what it is - a nice filler manicure in between better things.  This is OPI Ali's Big Break:


A lot more catching up tomorrow!  Honestly for real (I hope).  If you want to see a couple holiday looks, check out the "Watch me on YouTube" link in the sidebar for some tutorials for looks that I hope to have up here soon.
 
Thanks for reading.
 
~Colette

Sunday, December 18, 2011

NOTD: Mosaic Snowflales

This is the manicure I did as part of the Let it Snow collaboration on YouTube back on the 5th.  If you'd like to see some of the other amazing entries, check out my Let it Snow Playlist HERE.

I kind of knew everyone would expect a marble from me, so I wanted to do something completely different.  I stumped myself until I decided to play around with some small sequins.  I couldn't remember exactly where I got them but I went back to look & finally figured out I'm pretty sure they're part of the 10 wheel Bundle Monster rhinestones from Amazon.  The black base color is L'Oreal Raven's Strength.  I was really, really happy with this manicure, the sequins give such a different look in different lights:


The only thing I would change, in retrospect, is that I would have put 4 points on my index finger, and I think it would have been a bit more balanced than it was with only 3.  Relatively minor in the grand scheme of things LOL.

Here's the tutorial:


And here are a few shots of my experimenting, trying to figure out what exactly I was going to do with the sequins & if I wanted to include any rhinestones or glitter polish over the black base:


Thanks for reading =)

~Colette

Saturday, December 17, 2011

NOTD: OPI Designer ... De Better +bm221

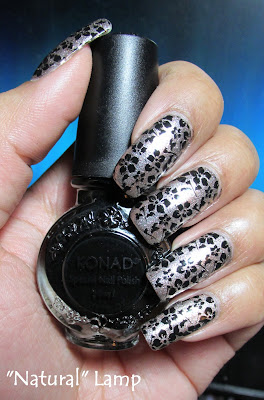
Mom kept calling this color champagne; and while the final effect is kind of a champagne color, I kept correcting her - it's silver with fine copper glitter.  And I think one of my favorite colors of the year, and became even more of a favorite after stamping! 
 
I started out with OPI Designer ... De Better & wore it solo for a few days, to me this is the best color from the Muppets collection:
 

I don't remember what polish I used for the stamping - either Konad Black Special Polish or Wet n Wild Black Creme ... whichever I found first at the time LOL.  They're pretty interchangeable as far as I'm concerned.  This lovely flower design is from Bundle Monster image plate bm221 & it took me a while to figure out which sides I wanted to match up, but I finally decided to stamp sideways, and match the top & bottom edges.  Some nails more successful than others, I particularly like the way my ring finger lined up, but even those that aren't right on look pretty good:
 

LOVED wearing this a lot =)  Finally getting into December manis with the stamped version.  I've still got pics to edit for my Mosaic Snowflakes, OPI Ali's Big Break, Ulta Into Astrono-Me? & my Candy Cane Water Marble, so stay tuned.  Had a great day of frosting & baking & tray making today!  & plenty of pics to come of that as well of course.  Thanks for reading.
 
~Colette

FAQ: Konad Part 2 - Accent Designs & Polish Choices

I didn't realize, until I went back & reviewed Part 1 to make sure I didn't repeat myself too much (you can check out Part 1 HERE if you missed it), that it had been nearly a year since I recorded it.  Time flies I guess =)
 
Part 2 ended up to be a lot longer than I initially thought, but I ended up talking about more than just the technique behind stamping small accent designs onto your nail.  I also touch on what brands other than Konad you can use & how to figure that out, & stamping a designs with multiple colors.  So if you're new to Konad, or just curious how I do mine, enjoy:
 
 
Today would be catch up blogging all day except for one thing - today is Cookie Day!!!  Honestly maybe my favorite day of the year, even above Christmas.  I'm sure I'll still get a few things posted, but most of the day will be spent frosting sugar cookies & making up trays.  If you missed my cookie frosting marbling last year, check it out HERE, posted with last year's Cookie Day pics - and stay tuned for not only pics from this year's Cookie Day, but some cooking tutorial vids very very soon.  I have 3 recorded, & although none are edited yet I'd like to get them all up before Christmas.
 
I hope any of your pre-holiday plans are going as well as mine =)  Although I still have to do the majority of my shopping!  Gah, don't know when I'll fit that in this week but we'll see.  Thanks for reading.

~Colette
NOTD: The Evolution of Butter London The Black Knight & Sally Hansen Lady Luck

So, my unworn pile ... heap ... well, let's be honest, mountain is getting a tad out of control.  Just a tad =)  So I had the thought I should try to do more manicures that use more than 1 color.  I wanted a lot of bling, and I thought that Butter London The Black Knight & Sally Hansen Lady Luck went really well together.  The bit of pink in TBK matches perfectly with LL.  But my first attempt, a totally blinged out funky french, didn't sit well with me:
 

It just came out so think & chunky looking.  I think it looks quite a bit better in these pics than it did IRL.  It was ridiculously late, but I couldn't stand it - since the polish wasn't completely set, it wasn't horrible to remove, even though they're both glitters.  I redid the mani with my original idea, going with TBK as my main color & LL for accent nails - I considered switching on my other hand but I ended up doing them both the same:
 

Then I had the not so great idea to matte-ify them ... then I thought if I dabbed on some clear to bring the glitter out, it might look like little gems on the matte background.  Final result was all of that but not a bag of chips if you know what I mean LOL.  Matte, yes, and little gems, yes - but one of my better ideas, no I don't think so:
 

Which is your favorite?  Mine is obviously the middle version, but everyone has their own taste so maybe you like #1 or #3 =)  Leave a comment & let me know!
 
Thanks for reading.
 
~Colette

Related Posts Plugin for WordPress, Blogger...