Wednesday, September 28, 2011

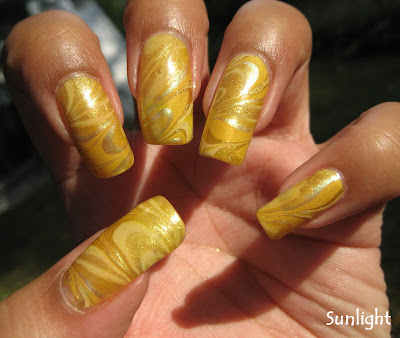
Sunny Yellow in the Sun

So the sun peeked out just long enough for me to get some better outdoor pics =)
 

I've got duo-chromey goodness to show you guys, and the haul post that is taking me such a long time for some reason.  I thought I would have time yesterday, and today, and obviously now the plan is tomorrow ... I certainly hope so LOL.  It's been like a month since I made the purchases.
 
Thanks for reading.

~Colette

Sunday, September 25, 2011

NOTD: Sunny Yellow Water Marble + Tutorial

As many of you know, yellow is NOT my favorite color.  Possibly my least favorite in fact.  But that didn't mean that it would be neglected in my Addicted to Color series, and I finally found 5 yellows that worked together & still had some contrast on the nail.  Base color is China Glaze Lighthouse, marbling done with Lighthouse, China Glaze Solar Power, Sally Hansen Hue, Orly Hook Up & Wet n Wild Collecting Pollen.  I wish we had a little sun to go with my sunny nails but although the temperatures have rebounded from the hard freeze, it's been pretty cloudy lately:


My favorite nails are left ring, index & thumb, right thumb:


And here's the vid:


The plan is to edit the haul vid & pic tomorrow after work, so stay tuned for that those of you that like hauls =)  Thanks for watching.

~Colette

Saturday, September 24, 2011

NOTD: Ulta Ruby Slipper + China Glaze Golden Enchantment

I realized I've been wearing a lot of colors from my most recent hauls, which I haven't even gotten around to posting yet, and this is another of them LOL.  I really will try to get the haul edited & posted tomorrow, but for now here's a look at Ulta Ruby Slipper:
 

After a day I topped it with something I seem to be using a lot lately - China Glaze Golden Enchantment:
 

This is actually still on my nails, I'm running to the library & the grocery store & then coming home to change it =)  Thanks for reading.

~Colette

Wednesday, September 21, 2011

NOTD: Ruby Kisses Tropical Green + China Glaze Techno Teal

So, as I mentioned in my last post, I nearly duped one of my own manicures again - I wanted something bright so I started with a base of Ruby Kisses Tropical Green, then I sponged the tips with China Glaze Techno Teal:
 

And I loved it!  & then ... I started getting that feeling ... that deja vu feeling.  After some searching I found a mani I'd done way back in January 2010 with China Glaze Entourage sponged with China Glaze Watermelon Rind - you can check out the original post HERE.  It was more green on green, and this one was like neon green with teal, but they are definitely very similar.  I suppose the longer I blog the more often & likely this is to happen LOL!

Thanks for reading =)

~Colette

Tuesday, September 20, 2011

NOTD: OPI It's My Year

OPI It's My Year, from the Miss Universe collection, is a gorgeous pinky-mauve with a heavy gold shimmer, that somehow ends up being a little bit coppery-bronzey in some lights:


But wait ... that description sounds so familiar ... all day on my nails I kept thinking ... deja vu ... I've worn this color before - I had to go back & search my blog to find the exact color, I remembered it was a Zoya & finally found that it was Zoya Faye (original post HERE).


Yes, the 2 are definitely close enough to be kissing cousins.  Not dupes but very very close =)  And then!  When I changed my mani I had the same thing happen again LOL, deja vu all day & had to come home & search ... stay tuned tomorrow to see my 2nd in a row nearly duplicate mani =)

Thanks for reading.

~Colette

Sunday, September 18, 2011

NOTD: OPI Congeniality is my Middle Name

Another from OPI's Miss Universe collection, Congeniality is my Middle Name is a gorgeous color but my one warning would be that the sparkle in it isn't very stable - it sinks down & collects however you have the bottle sitting, all on the bottom if it's sitting upright, or to the side if it's laying down.  I almost didn't buy it because it just looked like a boring creme until I picked it up & saw all the fuchsia shimmer waiting to be mixed back in.  Considering that, application was surprisingly good & even:
 

Hope to have time tomorrow to record a tut & get the crackles from my last haul swatched so I can get that uploaded as well.  Thanks for reading.
 
~Colette

Friday, September 16, 2011

How To: Basic Manicure

This is something that's been on my to-do list, and I've gotten requests for, for such a long time.  Like, basically since I started my YouTube channel, which is almost 2 years ago now!  Well, I finally got around to it, but it's far from flawless so I've got a lot of notes to add in this blog post =)
 
Here's the vid:


Now, the first thing I forgot to talk about, is other base coats.  I'm not super-particular about my base.  I used to use Pro Strong Instant Nail Builder, but I finally decided it was too expensive for how often I was painting my nails.  I gave Seche Clear a try, but while some staining I know is inevitable, it was really bad with that - so, much though I love my Vite, I'm not a fan of the Clear.  After that I tried Nail Life Gripper, and I like it so I've stuck with it.  It's not that expensive & the big bottle is handy since I use so much LOL.  I also have their Hide Ridges base, and I have a couple of bottles of Nubar's Foundation Base Coat, but I usually save that for Nubar polishes in particular since they don't always play nice with other brands.
 
The next thing, and kind of a huge thing to forget to mention in the vid, although people should be able to see to a point, is that I paint my nails directly on my desk, by which I mean both the hand being painted & the hand doing the painting are resting on the surface.  This lends your hands support, which can be especially important for your off hand.  You don't have to worry about holding your hands steady, just about making a steady stroke.
 
Deciding how many coats of color to do is going to depend on personal preference, thickness of coats, and the polish itself.  Some lovely colors are opaque & wearable in one coat, while others take two, three or even more.  The important part is to keep the layers as thin as possible, let them dry a reasonable amount (which will vary polish to polish LOL) between coats, and, well ... use the eyes in your head!  If it looks like it needs another coat, do another coat =)  One trick to knowing beforehand is to look at the polish on the brush - is it opaque or is it sheer enough you can see the brush color beneath?
 
Top coat - I am a huge Seche Vite fan.  If I learned nothing else blogging, Seche would be an invaluable piece of knowledge.  BUT - it doesn't work for everyone.  Call it body chemistry or whatever you want, some people don't like Seche, have problems with shrinkage or tip pull, and it just doesn't work well for them.  Nubar Diamont is quite nearly as good - as long as you get the good version.  There was a period they changed it & it sucked badly for a while so I'm always a bit wary for a lame bottle.  A lot of people like Poshe, although I have never tried it myself.  There's even a nameless bottle of apparent awesomeness available from one of the e-tailers that picked up the nickname of David after Gabrielle from The Edge of Sanity did an exhaustive Top Coat Comparison you can check out HERE.  The bottom line is that there are a lot of great top coats out there that not only add shine & protection but will get your nails dry a lot faster than just sitting around waiting.
 
My final tip is for painting your off hand - painting your right with your left for most people, and vice versa for all my lefties out there.  Unfortunately, there's no magic technique, no quick fix - you have to practice.  BUT - you don't only have to practice when painting your nails.  Use your off hand to do other things - if you're doing a puzzle, pick up puzzle pieces.  Heck, if your eating chips, pick up the chips with your off hand!  Don't just let it hang off the end of your arm the majority of the time & then be surprised when you can't do anything with it LOL =)
 
Whew - I think that's everything I forgot!  Feel free to share your own tips & secrets in the comments =)  Or on the Fan Page - I am still trying to find time to catch up with blog comments but I've managed to get on top & stay on top of Facebook comments for like a whole week!  Maybe eventually I'll learn how to properly balance & stay on top of everything at once LOL.
 
Thanks for reading ... especially today, because that's kind of a LOT of reading =)
 
~Colette
Wednesday, September 14, 2011

NOTD: OPI Swimsuit ... Nailed It! + Kleancolor Starry Purple

I was - as I often am - indecisive about what was going on my nails on Monday evening.  When I saw the Miss Universe pageant was actually on, I decided to reach for one of the colors from OPI's Miss Universe collection, and after a brief debate Swimsuit ... Nailed It! won.  This is already officially one of my favorite blues, and it has almost a chrome finish it's so metallic & shiny:
 

For the 2nd day I wanted to bling it up - I looked at the chunky silver Crown Me Already! from the same collection, the chunky silver but also holographic glitter Servin' Up Sparkle from one of my Serena Williams Glam Slam packs, but I finally went with this purple glitter from Kleancolor, with 3 different sizes of glitter in a clear base it's called Starry Purple - this is 2 coats on top of SNI, and most of the time it did look purple but in some lights & especially on camera it came out a bit on the pink side:
 

I've got a basic manicure tutorial that I filmed when I painted my nails with SNI - I'm going to attempt to get it edited tonight, but as often as my reach exceeds my grasp, not sure if that will actually happen LOL.  But it's coming!  I know I forgot a lot when I was recording too, so I'm going to fill in any blanks in the blog post.
 
Thanks for reading.
 
~Colette

Tuesday, September 13, 2011

NOTD: Butter London All Hail the Queen

This one was .... odd.  Butter London makes decent polishes - not worth the $14 price tag I don't think, but if you catch them on sale you might indulge.  But All Hail the Queen hid it's beauty in almost every light, and I didn't get enough time in the sun to really enjoy it.  & that honkin big square bottle is mighty awkward also, even with the fake part of the top off.  Anyway, if you enlarge the sun pic, you'll get just a hint of the different colored shimmers that are hiding in this apparently drab polish:
 

Thanks for reading =)
 
~Colette
Related Posts Plugin for WordPress, Blogger...