Showing posts with label Striping. Show all posts

Thursday, January 9, 2014

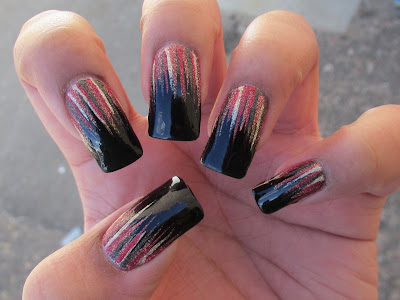
NOTD: Christmas Reverse Waterfall + Tutorial

Busy holidays, and then busy with snow & cold, but things are getting back to normal & I'm only a few posts behind.  This was my Christmas manicure - I'd been wanting to try striping from the tip rather than the cuticle ever since I did my Harvest Waterfall Mani.  Base color for this attenpt is China Glaze White On White, then the waterfall is done with China Glaze  Red-Y and Willing, Goldie but Goodie, Tongue & Chic, & Gossip Over Gimlets - all from the Autumn Nights Collection:


Here's the tutorial:


I have 3 more posts to catch up with - my Super Blingy Ombre Glitter Mosaic, which was the last mani on my long nails, and then 2 "plain" manicures on my new short nubbins.  Then there'll be a nubbins tutorial up this weekend!

Thanks for reading =)

~Colette

Sunday, December 8, 2013

NOTD: Harvest Waterfall + Tutorial

This was my Thanksgiving design for this year - Thanksgiving is always a bit of a challenge for me ... it's not really a holiday that has a wide range of themes LOL, so since I didn't want to do a turkey again I just went with traditional colors.  This look was inspired by a couple of designs by the Nailasaurus: that are on my Pinterest inspiration board HERE and HERE

I started of with a plain black base of OPI Black Onyx, then did the waterfall with 4 OPI Liquid Sand colors: What Wizardry is This?, Jinx, Honey Ryder, and Magazine Cover Mouse:


Here's the tutorial:


While I did like the textural contrast, after a few days I did add topcoat so that the entire mani was glossy:


Have you tried a waterfall manicure?  Which version of this one was your favorite?

Thanks for reading =)

~Colette
Wednesday, November 6, 2013

NOTD: Green Color Block for Depression Awareness + Tutorial

Well, this is just a tad late onto the blog, but I did manage to get it posted on YouTube before the end of October which was my goal.  (October is Depression Awareness Month)

This manicure was inspired by a design I saw on Pinterest and added to my "I Wanna Try That" board (here:  http://www.pinterest.com/pin/460422761875760772/), and after digging through just my unworns I picked a light green for my base color & seven additional greens for my blocks; Piggy Polish Daylilly's & Music, Color Club Kiss Me Mistletoe, Finger Paints Evergreen Dream, Icing All That Glitters is Green, Love & Beauty ? (no label & not sure if it ever had one), Sinful Colors Exotic Green, Ulta Army of 1 & Zoya Shawn:


I made each nail a little different, but if you have one that you particularly like, obviously you could stick with just one style.  Here's the tutorial:


I think I already have more ideas pinned than I may ever get to, but now that I'm finally on there I just can't help myself, there are so many cool ideas!  So you can count on seeing more Pinterest-inspired manis going forward =)

Thanks for reading.

~Colette

Wednesday, June 9, 2010

NOTD: Sally Hansen Sea And Be Seen w/ OPI Ink Stripes

This was kind of disappointing for me. I was tired, the lines didn't come out very straight or even, and I felt like the inverted triangle made my nails look shorter.  But the idea is worth revisiting, sometime when I've forgotten how much it frustrated me LOL.

I started out with a base of Sally Hansen Sea And Be Seen.  Gorgeous, lovely color but this was I think 3 coats & the only reason I didn't add a 4th was the fact that I knew I'd be doing the stripes on the tip to disguise the VNL.  I would suggest Sephora by OPI Underwater Fantasy as an alternative, because I recall it being more opaque & they're dupes ... you can see how many of Sally's spring colors are $OPI dupes HERE at Steph's Closet, it's kind of ridiculous.

After that dried, I used some blue painter's tape to mark off a triangle, and then a striper brush & OPI Ink to add stripes.  I don't hate this, but I don't love it either.  I think that meh feeling may be why I didn't get more pics ... oh, no wait - it was the rain.  Rained ALL freaking day on Tuesday.  Here are my inside shots:


This mani was inspired by this dress I saw in a magazine:


What do you think of this design?  Thanks for reading.

~Colette

Saturday, March 27, 2010

NOTD: Purple Lattice (Maybelline Goody Plum Drop + Grape Times) + Tutorial

Although I liked the blue color combination better, I really like the designs I did with this purple version.  I actually sat down & sketched out my ideas before I started this mani, picked the ones I liked best, and then did them so that each finger was different, and had a mirror image on the opposite hand.  Base color is Maybelline Goody Plum Drop (except the reversed accent nails) and the stripes are done with Maybelline Grape Times:


Here's the tutorial (eventually ... YT is quite slow on a Saturday, unfortunately):


Thanks for reading =)

~Colette

Friday, March 26, 2010

NOTD: Maybelline Pie In The Sky & Denim Dash

I loved this mani so much, it's on my nails again in a purple version =)  Pie in the Sky is from Maybelline's spring collection, Sweet Thing, and Denim Dash is one of the new colors recently added to their core line.  With the exception of accent nails on ring & thumb, I used PitS for my base & DD for the nail art, which I just used a liner brush to do.  I decided to call this my lattice design, and I switched it up a little on each nail:


I don't usually talk a lot about application & stuff ... if I like the color, I'm going to suffer through.  But the application on PitS was bad enough that I just want to let you guys know.  It was just gross.  DD on the other hand, which I'd actually been warned about, went on fine.  Yet, it was the reverse for the nail art - DD sucked & PitS was really smooth.  Whatever.  End result was good, if a bit on the messy side.
 
I kind of refined this idea & actually did some sketches before I did the purple version & accompanying tutorial.  I still actually like the blue on blue color combination better, but I like the designs I did for purple on purple.  I hope to have that up either later tonight (which I'll admit is on the doubtful side considering how late it already is...) or tomorrow.  So stay tuned =)  
 
Thanks for reading.

~Colette

Tuesday, March 16, 2010

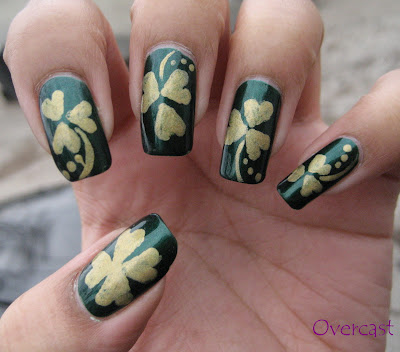
NOTD: Clovers/Shamrocks + Tutorial

Uhmmm... oops on taking a pic of this green pre-nail art.  I think that's pretty much always a sign that I'm really up too late doing my nails LOL.  So of course there are some things I would fix with this - but overall I liked it, it was super-festive & fun to wear.  I stuck with just 3 leaves except on my thumbs with I did lucky 4 leafed-clovers.  (I also made the mistake of connecting them in the center on the thumbs ... it made them look much sloppier)

For my base color, I used Nina Ultra Pro Emerald City (I did just get this, I swear, my hauls post is coming soon LOL).  Then for doing the clovers (or shamrocks ... although apparently clovers can have 3 or 4 leaves & shamrocks always only have 3), I used China Glaze GR8.  The holo was not super-apparent, but it was still a nice sparkly gold:


On another note, have I mentioned lately that I am a complete spazz 95% of the time? I JUST noticed today – after almost 4 months mind you – that I mis-spelled my name for my YouTube account…. Instead of SimpleLittlePleasures it shows as SimpleLittlePleasues.  I don’t know how my eyeballs managed to skim over that for so long but talk about irritating … of course, since I’m already at the character limit, I actually could not have it the way I wanted, it would have to be SimpleLittlePleasure … grrr.

Anyway, that’s my little mini-rant.  Since there’s no way to change it I’ll probably just complain about it at random intervals.  Because no way in hell would I start over, lose my subsribers & all the views my tutorials have received.  Especially since I can’t even have the name I want anyway.  My consolation is that my channel name does match the proper name of my blog, so … yeah.

That’s out of the way, enjoy the latest tut =)


Thanks for reading.

~Colette

Saturday, March 13, 2010

NOTD: Sinful Show Me The Way

So, in the interest of St. Patrick's day, I've been trying to work my way through some of my unworn greens =)  This mani lasted me a couple of days, I started out with Sinful Colors Show Me The Way, then I added a coat of Matte Magic ... then I thought I'd do some nail art in glossy topcoat, but I really wasn't thrilled with it, so you'll see in the last pic that I ended up going over that with MM again:


I haven't had anything that my nails look like lately, but this little butterfly thing was on a co-worker's desk & I was immediately struck by how similar the color was =)

For the 2nd day of this mani, I added some Konad, with image plate m72.  I used L'Oreal Yellow Buzz for the stamping.  I was originally going to use Ghetto Fabulous, but when I tested it on the pinky it was almost invisible, so I switched from gold to yellow.  This is the first time I've used this design, I like it a lot better on my nail than on the plate.  I also used a glossy topcoat this time,:


Thanks for reading.

~Colette

Wednesday, February 3, 2010

NOTD: Vday Funky French + Tutorial

Well, this turned out sloppier than in my head, but practice makes perfect as they say & overall I'm really quite pleased with how it turned out.  I got a little bit of streaking from the black on a couple of nails where I was a bit impatient with my sparkly topcoat, but that's what I get for doing my nails right before bed I guess.  I was also dissapointed that Orly Twilight, which I used as a base color as well as over the design, didn't show up a little more - it's so pretty in the bottle.  You can see it a little in the shot with flash but overall it didn't pop as much as I wanted.  White is Color Club French Tip, black is Color Club Black:


And here's the tutorial =)


Thanks for reading.

~Colette

Wednesday, January 6, 2010

NOTD: Pure Ice A List

One more before I go to bed.  I was pretty pleased with how this turned out.  I used Pure Ice A List for my base color, and the nail art is done with Pure Ice Celestial (blue) & No Means No (purple):


Thanks for reading =)

~Colette
Related Posts Plugin for WordPress, Blogger...