Showing posts with label Holiday. Show all posts

Saturday, February 1, 2014

NOTD: New Year's Super Blingy Ombre Glitter Mosaic + Tutorial

So far, we have already received nearly a foot more snow than we normally average in an entire winter.  And all that shoveling is what I'm blaming my lack of posting in January on ... winter doesn't appear to be letting up any time soon but I guess I'm not surprised ...  that's where the name Minne"snow"ta came from =)

Anyway, here is what I had on my nails for New Year's, just before I made a big chop (which if you haven't see on YouTube, Facebook, Instagram, etc will be coming up in my next post).  The base color is just OPI Black Onyx; the glitter ombre is done with Martha Stewart glitter from Michaels in the colors Onyx, Sterling, Florentine Gold, Fire Opal, Garnet, Tourmaline, Kunzite, Charoite, Lapis Lazuli, Turquoise, Verdalite & Olivine:


The overall ombre was a beautiful effect, although some nails the difference was very drastic, such as on the black/silver nail - some nails the difference was nearly invisible, such as on the red/orange nail:


Here's the tutorial:


This look was inspired from a design on Pinterest, and I did it my own way before I actually read up on the blog posts by the original creator.  That's how I usually do it unless I really can't figure out how to accomplish the effect, but after the fact I learned quite a lot from reading, watching, and even a few comments back and forth with Polish All The Nails.  So the next time I do a glitter mosaic - and there will definitely be a next time - I plan on using at least 2 coats of my base color, to give the glitter a deeper layer to be pressed into.  Also, I trimmed the overhanging glitter & then added a topcoat - I think I would topcoat to help the glitter stay in place, then trim, then more top coat to smooth everything out.  This wasn't horribly rough - and actually wore much better than I expected, only losing a few glitters by the time I took it off - but I think with practice I can get it even smoother!

This was a super fun manicure to wear, I kept in on a whole week & I got a LOT of compliments ... here's a look at it in motion:


Do you have the patience to do a look like this?  Maybe just as an accent nail would be enough for many LOL.

Thanks for reading.

~Colette

Sunday, December 15, 2013

NOTD: Formula X for Sephora Atom + Eve

I was going to do something fancier for my company holiday party, but I ended up running a bit short on time & so I just went with a red glitter - because that's always a great Christmas choice =)  This is Formula X for Sephora Atom + Eve:


This was also I think the only time I can remember having a polish on at the same time as my mom - she chose it for her church choice holiday concert - looks a bit different on her short nails  but obviously still a gorgeous color:


Thanks for reading!

~Colette

Sunday, December 8, 2013

NOTD: Black & Wine Water Marble + Tutorial

I wanted to do something for the holidays without being blatantly red & green - I thought this deep wine was festive without being too traditional.  I used China Glaze Don't Make me Wine as my base color, then marbled with that & China Glaze Liquid Leather:


Here's the tutorial:


Several more holiday design to come before the end of the month =)  Thanks for reading.

~Colette

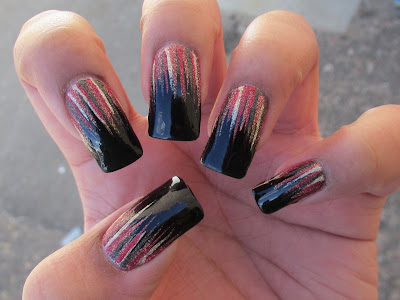
NOTD: Harvest Waterfall + Tutorial

This was my Thanksgiving design for this year - Thanksgiving is always a bit of a challenge for me ... it's not really a holiday that has a wide range of themes LOL, so since I didn't want to do a turkey again I just went with traditional colors.  This look was inspired by a couple of designs by the Nailasaurus: that are on my Pinterest inspiration board HERE and HERE

I started of with a plain black base of OPI Black Onyx, then did the waterfall with 4 OPI Liquid Sand colors: What Wizardry is This?, Jinx, Honey Ryder, and Magazine Cover Mouse:


Here's the tutorial:


While I did like the textural contrast, after a few days I did add topcoat so that the entire mani was glossy:


Have you tried a waterfall manicure?  Which version of this one was your favorite?

Thanks for reading =)

~Colette

Thursday, October 31, 2013

NOTD: Goodwill Halloween Faces + Tutorial

This is so my favorite commercial right now - just puts a smile on my face every time I see it, and I (along with nearly everyone else in my family &, it turns out, many people at work) can't help but to sing along - if you haven't seen it yet, you can see it on YouTube here: http://www.youtube.com/watch?v=Vw4De9it-8Q&feature=share&list=LLl6OwCbW6bdtZ14hoxJrgwg

So, since the faces are all pretty basic, I decided to try my hand at putting them on my nails.  Just picking out the polish for this manicure took longer than some of my designs!  And would you believe that with over 2000 bottles of polish, I still had a bit of trouble?  I would have liked the pirate's beard to be a slightly lighter brown, but I didn't have one that was a creme, and since I was able to find creme matches for all the others, I didn't want to use a shimmer there.  So I just went with the slightly darker shade that was used for the cat/werewolf.  There were a few other things like that, but overall I think I did a pretty good job color matching everything.

I used black acrylic paint for the details, and 18 polishes for everything else:  China Glaze Papaya Punch, Essie Boxer Shorts, Nails Inc Tate, Nails Inc The Thames, Nubar Milk Chocolate Creme, OPI Alpine Snow, Orly Glow, Orly Orange Punch, Revlon Stone Edge, Ulta Blue Streak, Zoya Blu, Zoya Carmen, Zoya Evvie, Zoya Jacqueline, Zoya Josie, Zoya Neely, Zoya Pippa & Zoya Shawn.  Whew!  But worth it I think:


Here's a close-up view ... I see I could have done a bit more cleanup at the cuticle area LOL:


Here's the tutorial - there are annotations to navigate to each one, so if you only want to see a few of the faces it's easy to jump around:


This was a fun mani, I was a bit sad when I took it off to fix the break in my index (that you might have noticed on some of the pictures on the witch nail).

Thanks for reading!  I hope you all have a safe & happy Halloween =)

~Colette

NOTD: Skull & Crossbones + Tutorial

So, as far as old vs. new posts, I decided that I'm going to do both.  If I just try to do the old stuff, I'll feel like I'm just falling further behind & it would be true.  Plus, with Halloween today & the holidays right around the corner, no way I'd get caught up in time to share this year's themed manis with you.  So, I'll just try to state whether what you're looking at is old or new ... although in the end, it probably doesn't matter that much, right?  Nails are nails & a mani that was beautiful a few months ago is still beautiful today.

This post is a new mani, for this year's Halloween.  I wasn't sure at first if I was going to do any Halloween manis this year, I just didn't have much inspiration, and then I decided to do these ... they weren't my favorite ever, because as you know I'm a perfectionist, but it was fun to do & good practice at freehanding (which I need).  Base colors were OPI Black Onyx & OPI Alpine Snow, bones done with AS & the skull done with black acrylic:


Here's the tutorial:


And I actually ended up doing another, even free-handier, Halloween design - stay tuned for all of the little Goodwill Halloween faces from the commercial!

Thanks for reading.

~Colette
Related Posts Plugin for WordPress, Blogger...