I do wish I'd used slightly smaller rhinestones for this look, but other than that it turned out mostly as planned. And while the tips & ring finger may look like a dark blurple, they're really Wet n Wild Black Creme topped with Savvy French Rose Opal Frost:
So, my unworn pile ... heap ... well, let's be honest, mountain is getting a tad out of control. Just a tad =) So I had the thought I should try to do more manicures that use more than 1 color. I wanted a lot of bling, and I thought that Butter London The Black Knight & Sally Hansen Lady Luck went really well together. The bit of pink in TBK matches perfectly with LL. But my first attempt, a totally blinged out funky french, didn't sit well with me:
It just came out so think & chunky looking. I think it looks quite a bit better in these pics than it did IRL. It was ridiculously late, but I couldn't stand it - since the polish wasn't completely set, it wasn't horrible to remove, even though they're both glitters. I redid the mani with my original idea, going with TBK as my main color & LL for accent nails - I considered switching on my other hand but I ended up doing them both the same:
Then I had the not so great idea to matte-ify them ... then I thought if I dabbed on some clear to bring the glitter out, it might look like little gems on the matte background. Final result was all of that but not a bag of chips if you know what I mean LOL. Matte, yes, and little gems, yes - but one of my better ideas, no I don't think so:
Which is your favorite? Mine is obviously the middle version, but everyone has their own taste so maybe you like #1 or #3 =) Leave a comment & let me know!
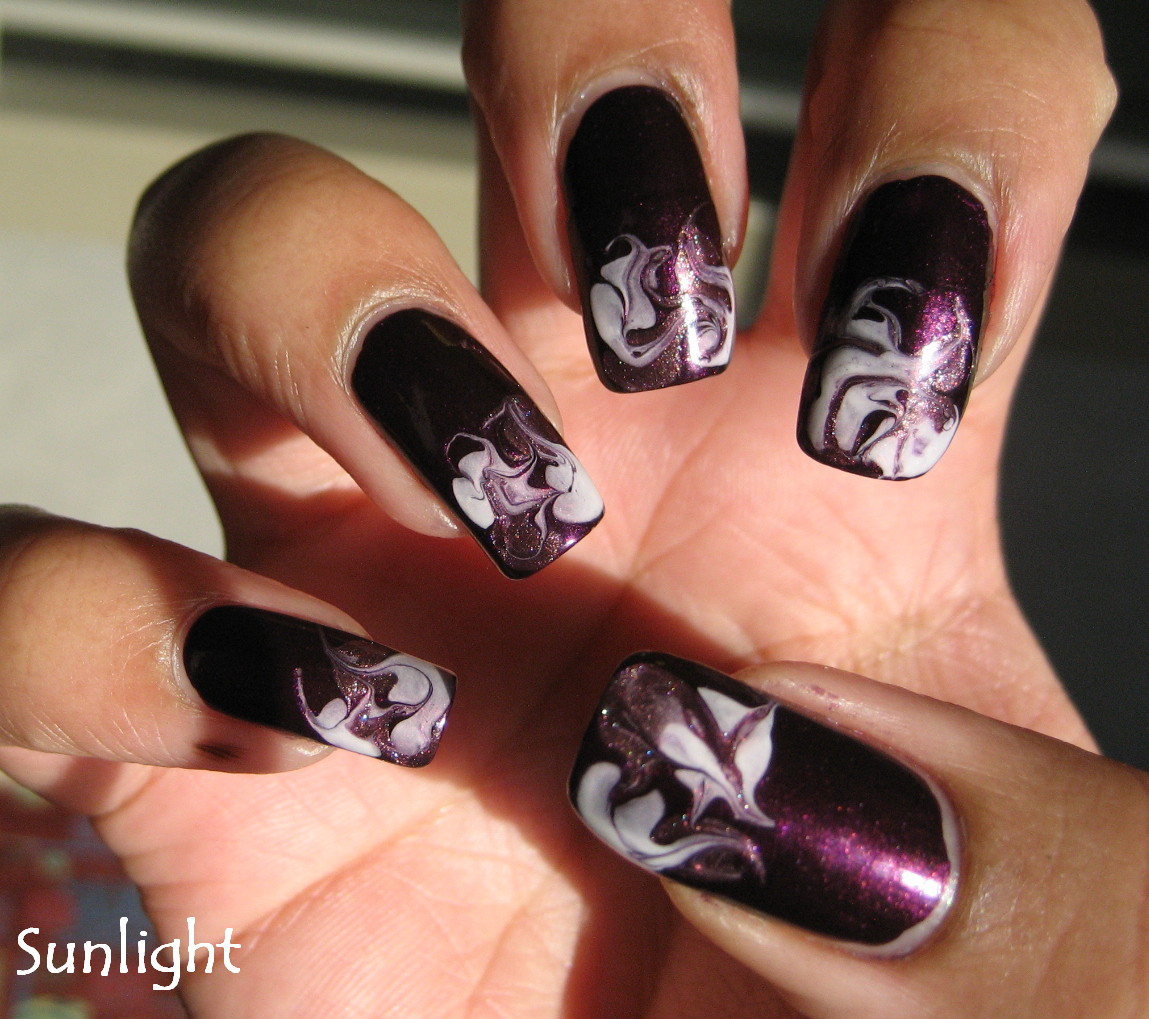
I have always received a lot of requests for french tip marbling, and somehow just never got around to it - until now. Pretty happy overall with how it turned out although I still see room for improvement. Base color is Finger Paints Prints & Printsess, marbling done with P&P & Orly Liquid Vinyl:
Favorite nails are left pinky, left index (the ideal design IMO, what I'd like them all to look like), left thumb & right index:
Here's the tutorial:
Lots more Halloween designs to come. I posted an old slideshow on YouTube of NOTDs from October 2009 & generated a lot of requests for tutorials for those old designs, but I already have a whole list of new designs so it will be a little competition with myself how many I manage to get done before the holiday =)
I thought about titling this "Nubbins Mani #1" to see at what exact point I stop thinking about them as nubbins LOL, but I decided to refrain. Mom said she thought the french tips made them look even shorter but I actually think a french makes nails look longer, and I prefer it when my nails are short,. A french just start to look weird when the tip is the same size as the bed of the nail LOL. So after a certain point in length I stop wearing them much.
This was 3 coats of Wet n Wild Ocean Grotto, then I freehanded the tips with WnW Black Creme, then one more coat of OG to give the tips some shimmer. It looked green in the bottle, more yellow on the nail, but when I put it next to my green dress it matched. So I'm not sure what color to call it:
Green or yellow or somewhere in between, I quite like how it turned out =) Thanks for reading.
I know my water marbling reputation is, well .., kind of awesome =) But even I fail sometimes, and I failed a lot in my latest experiments. I failed enough that it didn't make it onto my nails & I ended up doing this instead at like midnight - base color is Sinful What's Your Name, drag marbling done with China Glaze Virtual Violet & Techno Teal:
Here's the tutorial - kind of surprised it turned out coherent as tired as I was LOL:
I haven't give up permanently - I will probably continue experiments this weekend. It's been like 2 weeks since I had a marble & this Addicted to Color will not get the best of me! Thanks for reading.
So.... like last year I have managed to miss my blog's anniversary! I see 2 years was on the 14th, Friday ... I have even less excuse this year than last, it didn't even occur to me until just now - I looked & saw I was late. Maybe 3rd time will be the charm next year LOL?
For the nails I have Wednesday's mani, another drag marble - I used OPI Plum Full of Cheer as the base colors, and 2 dots each on the tips of OPI Meet Me on the Star Ferry & OPI Fit For a Queensland:
Here are my favorite nails:
I just had to buy extra Picasa storage to show these to you guys too! That's been on my to-do list since the beginning of the year, but my awesome powers of procrastination put it off. Thanks for reading =)
I started off this mani with a base of China Glaze Fairy Dust, just to put some sparkliness on my nail bed. Then I did chevron-shaped french tips with Wet 'n' Wild Black Creme - then I went over that with 2 coats of OPI DS Original:
The black base really makes Original pop a nice dark purple (you can see it by itself, much lighter, HERE). I should do more funky frenches, I always do enjoy them =) Thanks for reading.
I don't know quite what to say about this. It was disappointing on so many levels. I knew that Claire's Mermaid was sheer, and I thought I had a pretty good plan for dealing with that - a black french tip with a silver smile line. I used Color Club Black for my tips - I really should have used some polish thinner on it beforehand, but it was sooo late, and I was sooo lazy. I used Art Club Satin Silver striper for the smile line, a very pale silver. I did 2 coats of Mermaid over the top. And got this:
Poor application all around, sloppy french tips - if it hadn't been 11 o'clock I'd have taken it off & started from scratch. I should have picked something more foolproof in the first place ... oh well. I even had one girl at work tell me they weren't up to my usual standard, which horrified my mother that anyone would say anything so mean - of course, she liked them & didn't see most of the glaring errors that bugged me all day LOL.